Node.js
This SDK can be used both on the server and in the browser. If you are using a frontend framework like React or Vue you probably want to use the specialized SDK which uses this package under the hood.
Installation
Add the client to your dependencies:
npm i tggl-clientQuick start
Client side
On client-side applications (browsers, React Native, etc.) use the TgglClient with a client API key:
import { TgglClient } from 'tggl-client'
const client = new TgglClient({
apiKey: 'XXX',
initialContext: { userId: 'abc123' },
})
await client.waitReady()
if (client.get('my-feature', true)) {
// ...
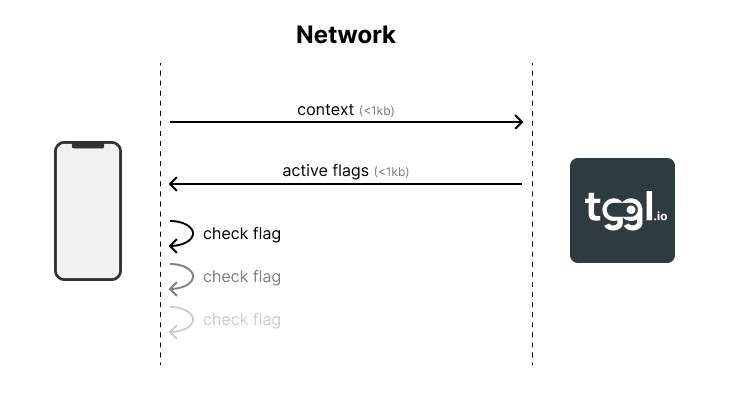
}The client uses the remote evaluation paradigm, which means that feature flag evaluations are performed on a remote server everytime the context changes, usually when the app starts or when the user logs in.
The context is kept as state in the client, and can be updated using the setContext method:
// User just logged out
await client.setContext({ userId: null })
You should await the setContext method to ensure that the context has been updated and the flags re-evaluated before using get again. Note that all flags are evaluated at once in a single API call, the get method does not perform any network request.
Server side
On the server use the TgglLocalClient with a server API key:
import { TgglLocalClient } from 'tggl-client'

const client = new TgglLocalClient({
  apiKey: 'XXX',
})

await client.waitReady()

if (client.get({ userId: 'abc123' }, 'my-feature', true)) {
  // ...
}
The local client uses the local evaluation paradigm, which means that feature flag evaluations are performed locally using a copy of the feature flag configuration stored in memory. The configuration is synchronized with the Tggl API in the background.

The TgglLocalClient lets you evaluate millions of contexts per second since no network request is performed during evaluation. The context is passed as the first argument of the get method.
You can easily create a static client for each HTTP request to avoid passing the context around:
const client = new TgglLocalClient()

app.use((req, res, next) => {
  req.tgglClient = client.createClientForContext({
    userId: req.user.id,
  });

  next();
})

app.get("/profile", (req, res) => {
  const value = req.tgglClient.get('myFlag', 'default_value')

  res.json({ message: `Flag value: ${value}` });
});
Evaluating flags
The get method is used to evaluate feature flags. It takes the flag key as the first argument and a default value as the second argument, which is returned if the flag is not found or if an error occurs during evaluation. Note that the TgglLocalClient needs the context as its first argument.
if (client.get('my-feature', true)) {
  // ...
}
Choose the default value carefully to ensure your application behaves correctly even if the Tggl service is unreachable for any reasons (including your user's network) or if someone from your team inadvertently removes the flag entirely.
Typing
CLI
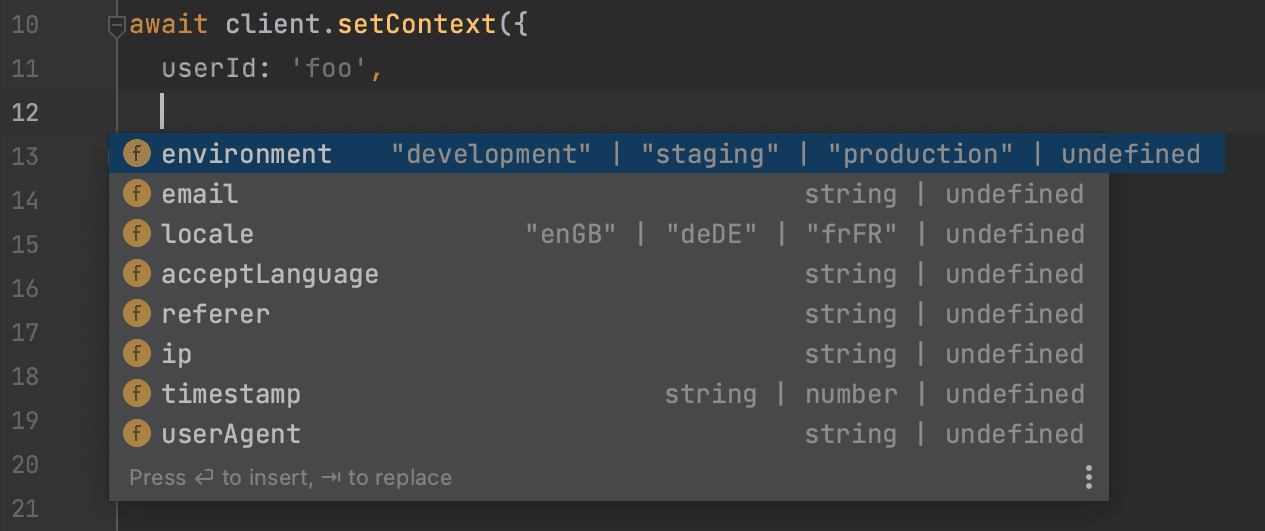
Using the Tggl CLI you can run an introspection query to generate the TypeScript types for your flags and context.
# Install the CLI once
npm i --save-dev tggl-cli

# Generate the types every time that it is needed
tggl typing -k <SERVER_API_KEY> -o src/tggl.d.ts

# Drop the -k option if you have the TGGL_API_KEY environment variable set
tggl typing -o src/tggl.d.ts
Replace <SERVER_API_KEY> with your server API key or use the TGGL_API_KEY environment variable and omit the -k option. You should run this command everytime you need to update the typing. Your IDE will now autocomplete and type-check the context properties and all flag names and values.
All context properties are required except properties that you have hidden. You can also use the -h option to remove hidden properties from the context.
| Option | Description |
|---|---|
-k, --api-key <key> | Tggl API key, defaults to TGGL_API_KEY environment variable |
-o, --output <file> | File to write the typing to, *.d.ts to override the package typing, *.ts to simply generate interfaces |
-h, --skip-hidden | Skip hidden properties in context (default: false) |
-p, --package <package> | Name of the package to declare types for (default: "tggl-client") |
--help | display help for command |
Typing system
The CLI generate two interfaces: TgglContext and TgglFlags that look like this (based on your own configuration on Tggl):
interface TgglContext {
  userId: string
  email: string
  timestamp: string | number
  environement: "production" | "local" | "staging"
}

interface TgglFlags {
  new_blog_layout: true
  color_button: "#00ff00" | "#0000ff"
}
They are used by default by the client, but you can manually override them if you need to, notably if you want to instantiate multiple clients for different projects:
const clientOne = new TgglClient<
  FlagsProjectOne,
  ContextProjectOne
>({ apiKey: 'API_KEY_ONE' })

const clientTwo = new TgglClient<
  FlagsProjectTwo,
  ContextProjectTwo
>({ apiKey: 'API_KEY_TWO' })
The SDK also exports some helper types if needed:
import { TgglFlagSlug, TgglFlagValue, TgglFlags } from 'tggl-client'

// Slug type
const slug: TgglFlagSlug = 'new_blog_layout'
const slug: TgglFlagSlug<{ flag_a: true }> = 'flag_a'

// Value type
const value: TgglFlagValue<'color_button'> = "#00ff00"
const value: TgglFlagValue<'my_flag', { my_flag: 'a' | 'b'}> = "b"

// Use it to build typed functions
function getFlag<
  TFlags extends TgglFlags = TgglFlags,
  TSlug extends TgglFlagSlug<TFlags> = TgglFlagSlug<TFlags>
>(slug: TSlug): TgglFlagValue<TSlug, TFlags> | undefined {
  // ...
}
Waiting for the client to be ready
The client has to load the initial state once before being able to correctly evaluate flags. If you call get before the client is ready, it will return the default value for all flags.
There are multiple ways to wait for the client to be ready:
// 1. Using waitReady
await client.waitReady()

// 2. Using an event listener
client.onReady(() => {
  // ...
})

// 3. Using the isReady property
if (client.isReady()) {
  // ...
}
The client is ready as soon as the first network request has been completed (even if it fails), or if the state can be retrieved from one of the storage first.
Polling for "live" updates
You can update your flags at anytime from the Tggl dashboard. To get these updates "live" in your application, you can enable polling when creating the client:
const client = new TgglClient({
  // Enable polling every 10 seconds
  pollingIntervalMs: 10_000,
})
While polling is disabled by default ont TgglClient, it is enabled by default on TgglLocalClient every 5 seconds since local evaluation usually runs for long periods of time until your server reboots.
const client = new TgglLocalClient({
  // Change the default polling interval from 5 to 15 seconds
  pollingIntervalMs: 15_000,
})
Polling can be enabled at any time after the client has been created (if polling is already enabled, this will change the interval):
client.startPolling(20_000) // Every 20 secondsYou can disable polling at any time:
client.stopPolling()
// Same as stopPolling using a value of 0 or less
client.startPolling(0)
You can manually trigger a refresh of the state at any time:
await client.refetch()Storages
Storages are used to cache state between application restarts to improve startup time and have a fallback mechanism in case the Tggl API is unreachable. They are completely optional, but highly recommended for production applications.
The TgglClient comes with a built-in localStorage storage for browser environments. If you are using the client in a browser, you don't need to set up a storage unless you want to customize it.
A storage must implement the TgglStorage interface:
import { TgglStorage } from 'tggl-client'

const myStorage: TgglStorage = {
  get() {
    return localStorage.getItem('tggl-flags')
  },
  set(value: string) {
    localStorage.setItem('tggl-flags', value);
  },
}
The get and set methods are used to retrieve and store the state respectively. The state is serialized under the hood by the client, and the methods can be async if needed.
Optionally, you can specify a close method to clean up any resources when the client is closed.
Then, you can use your storage when creating the client:
const client = new TgglClient({
  storages: [myStorage],
})
For redundancy, you can provide multiple storages. The client will try to read from each storage in order when starting, and will write to all storages when the state is updated. This way, if one storage fails, the client can still retrieve the state from another storage.
Built-in storages
LocalStorage
The localStorageStorage is provided out-of-the-box for browser environments, you don't need to do anything. It stores flags in the LocalStorage for instant availability on refresh. If you want to be explicit, you can import and use it like this:
import { localStorageStorage, TgglClient } from 'tggl-client'

const client = new TgglClient({
  // Already the default on browser environments
  storages: [localStorageStorage],
})
Static storages
The TgglClientStaticStorage is a simple storage that uses a static set of flags. It can be useful for testing or server-side rendering. You can hard-code the list of flags or call the getAll method to retrieve them dynamically:
import { TgglClientStaticStorage, TgglClient } from 'tggl-client'

const client = new TgglClient({
  storages: [new TgglClientStaticStorage({
    flagA: 'foo',
    flagB: 'bar',
  })],
});
The TgglLocalClientStaticStorage is similar to TgglClientStaticStorage, but for the TgglLocalClient. You can hard-code the config or call the getConfig method to retrieve it dynamically:
import { TgglLocalClientStaticStorage, TgglLocalClient } from 'tggl-client'

const client = new TgglLocalClient({
  storages: [new TgglLocalClientStaticStorage(config)],
});
PostgresSQL
The TgglPostgresStorage is a storage that uses a PostgreSQL database to store the flags configuration. It can be useful for server-side applications that already use PostgreSQL. You must install the pg package to use it, the configuration is the same as the PoolConfig from the pg package.
Under the hood, it creates a table named tggl_config.
npm install pgimport { TgglPostgresStorage, TgglLocalClient } from 'tggl-client'
const client = new TgglLocalClient({
storages: [
new TgglPostgresStorage({
connectionString: DATABASE_URL,
})
],
});Redis
The TgglRedisStorage is a storage that uses a Redis database to store the flags. It can be useful for server-side applications that already use Redis. You must install the redis package to use it, the configuration is the same as the createClient function.
Under the hood, it uses a key named tggl_config.
npm install redisimport { TgglRedisStorage, TgglLocalClient } from 'tggl-client'
const client = new TgglLocalClient({
storages: [
new TgglRedisStorage({
url: REDIS_URL,
})
],
});Storage only pattern (no network)
Even if the client will prime its state from storages at startup, it will still try to fetch the latest state from the Tggl API unless you disable the initial network request by setting initialFetch to false when creating the client:
const client = new TgglClient({
  storages: [new TgglClientStaticStorage({
    flagA: 'foo',
    flagB: 'bar',
  })],
  initialFetch: false,
});
This can be useful for server side rendering or unit tests where you want to use a static set of flags without making any network request.
Shared storages
If multiple instances of your backend share the same database storage (e.g. PostgreSQL or Redis), they will work together to keep the state up-to-date. If a single instance loosees connectivity to the Tggl API, it will still be able to get updates from other instances through the shared storage.
Reporting
By default, the SDK sends flag evaluation data to Tggl to give you precious insights on how you are actually using your flags in production and to help you manage flags lifecycles better.
By default, reporting is batched and sent every 5 seconds to reduce network usage. You can change the reporting interval when creating the client:
const client = new TgglClient({
  reporting: {
    flushIntervalMs: 10_000, // Every 10 seconds
  },
})
You can change the reporting interval at any time after the client has been created:
const reporting = client.getReporting()

// Start reporting (or change interval) every 10 seconds
reporting.start(10_000)
You can also stop reporting at any time:
reporting.stop()
// Same as stop using a value of 0 or less
reporting.start(0)
You can disable reporting from the beginning by setting reporting to false when creating the client:
const client = new TgglClient({
  reporting: false,
})

const reporting = client.getReporting()
reporting.isActive() // => false
Even when reporting is disabled, you can still get the TgglReporting instance using the getReporting method and manually flush events:
await reporting.flush()Using the proxy
Having a proxy between your application and the Tggl API can help reduce latency, improve reliability, and reduce costs. You can easily configure the client to use a proxy by setting the baseUrls option:
const client = new TgglClient({
  baseUrls: ['https://my-tggl-proxy.example.com'],
})
Note that baseUrls is an array, so you can provide multiple URLs for redundancy. The client will automatically rotate through the list of URLs (in order) in case of failures. The client will always fall back to the Tggl API if all provided URLs fail. You can also provide both proxy URLs and the Tggl API URL in the same list if you want to control the order of preference.
const client = new TgglClient({
  baseUrls: [
    'https://my-tggl-proxy1.example.com',
    'https://api.tggl.io',
    'https://my-tggl-proxy2.example.com',
  ],
})
The baseUrls you provide will be automatically be passed down to the TgglReporing instance used by the client, so reporting will also go through the proxy unless you explicitly override the value.
Retry mechanism
Because network requests can fail for various reasons (network issues, server issues, etc.), the client has a built-in retry mechanism with an exponential backoff policy with a max delay of 500ms (1st retry after 150ms, then 300ms, then 500ms onwards).
const client = new TgglClient({
  // Retry at most 2 times after first failure (default is 3)
  maxRetries: 2,
  // Timeout requests after 5 seconds (default is 8 seconds)
  timeoutMs: 5_000,
})
You can disable the retry mechanism by setting maxRetries to 0, but this is not recommended in production environments. Finally, timeouts are applied to each individual request, not to the whole retry sequence.
Not every request is retried. For example, if the server returns a 401 error code, the request is considered failed and will not be retried.
The retry mechanism is applied to each baseUrls individually. For example, if you have 3 URLs and maxRetries is set to 2, the client will try each URL up to 3 times (1 initial try + 2 retries) before moving to the next URL.
Tracking
To integrate with your existing tracking system, you can register a callback that will be called everytime a flag is evaluated:
client.onFlagEval((event) => {
  console.log('Flag evaluated:',
    event.slug,
    event.value,
    event.default,
  )
})
On the backend, this can be done per HTTP request very easily:
const client = new TgglLocalClient()

app.use((req, res, next) => {
  req.tgglClient = client.createClientForContext({
    userId: req.user.id,
  });

  req.tgglClient.onFlagEval((event) => {
    console.log('Flag evaluated for user:', req.user.id, event.slug)
  })

  next();
})
Error handling
For resiliency, the client swallows all errors and returns the default value when an error occurs during flag evaluation. However, you can listen to error events to be notified when an error occurs:
client.onError((error) => {
  console.error('Tggl client error:', error)
})
Additionally, you can get the error from the last operation using the getError method:
const error = client.getError()Gracefully shutting down
For unit tests, SSR, or server-side applications, you may want to gracefully shut down the client to ensure that everything stops before exiting. You can do this using the close method:
await client.close()This will stop any background tasks (polling, reporting, etc.), will make sure to send the last reporting data, will close any open connections, and will close all storages. You should await this method to ensure that everything has been cleaned up before exiting your application.