Collaborating effectively with your team on Tggl
If you are looking to streamline collaboration between your technical and non-technical teams, you’re in the right place. Tggl was designed to minimize frustration in tech teams by eliminating low-value tasks, and to empower your entire team to control your product within their scope of work.
With Tggl, customization is key. You can create roles that mirror your organization's structure and assign specific access levels to each. This flexibility ensures:
- Empowerment for non-technical teams: Gain control over simple configuration tasks and release management without the fear of breaking anything.
- Confidence for tech teams: Rest assured knowing critical settings are safeguarded against misconfiguration.
How does Tggl make sure to prevent app misconfiguration?
Tggl's design prioritizes preventing app misconfiguration:
- Tech teams set context property values with strict rules, limiting changes to predefined, safe options.
- In case a flag is accidentally deleted, your app defaults to a pre-set safe value, avoiding crashes. In other words, it’s impossible for a non-tech to crash the app.
Step-by-step guide to setting up roles and access on Tggl
You can very easily define roles and access on Tggl. Here’s how:
- Navigate to the 'Manage team' tab: Accessible from the dashboard or the 'Settings' menu.
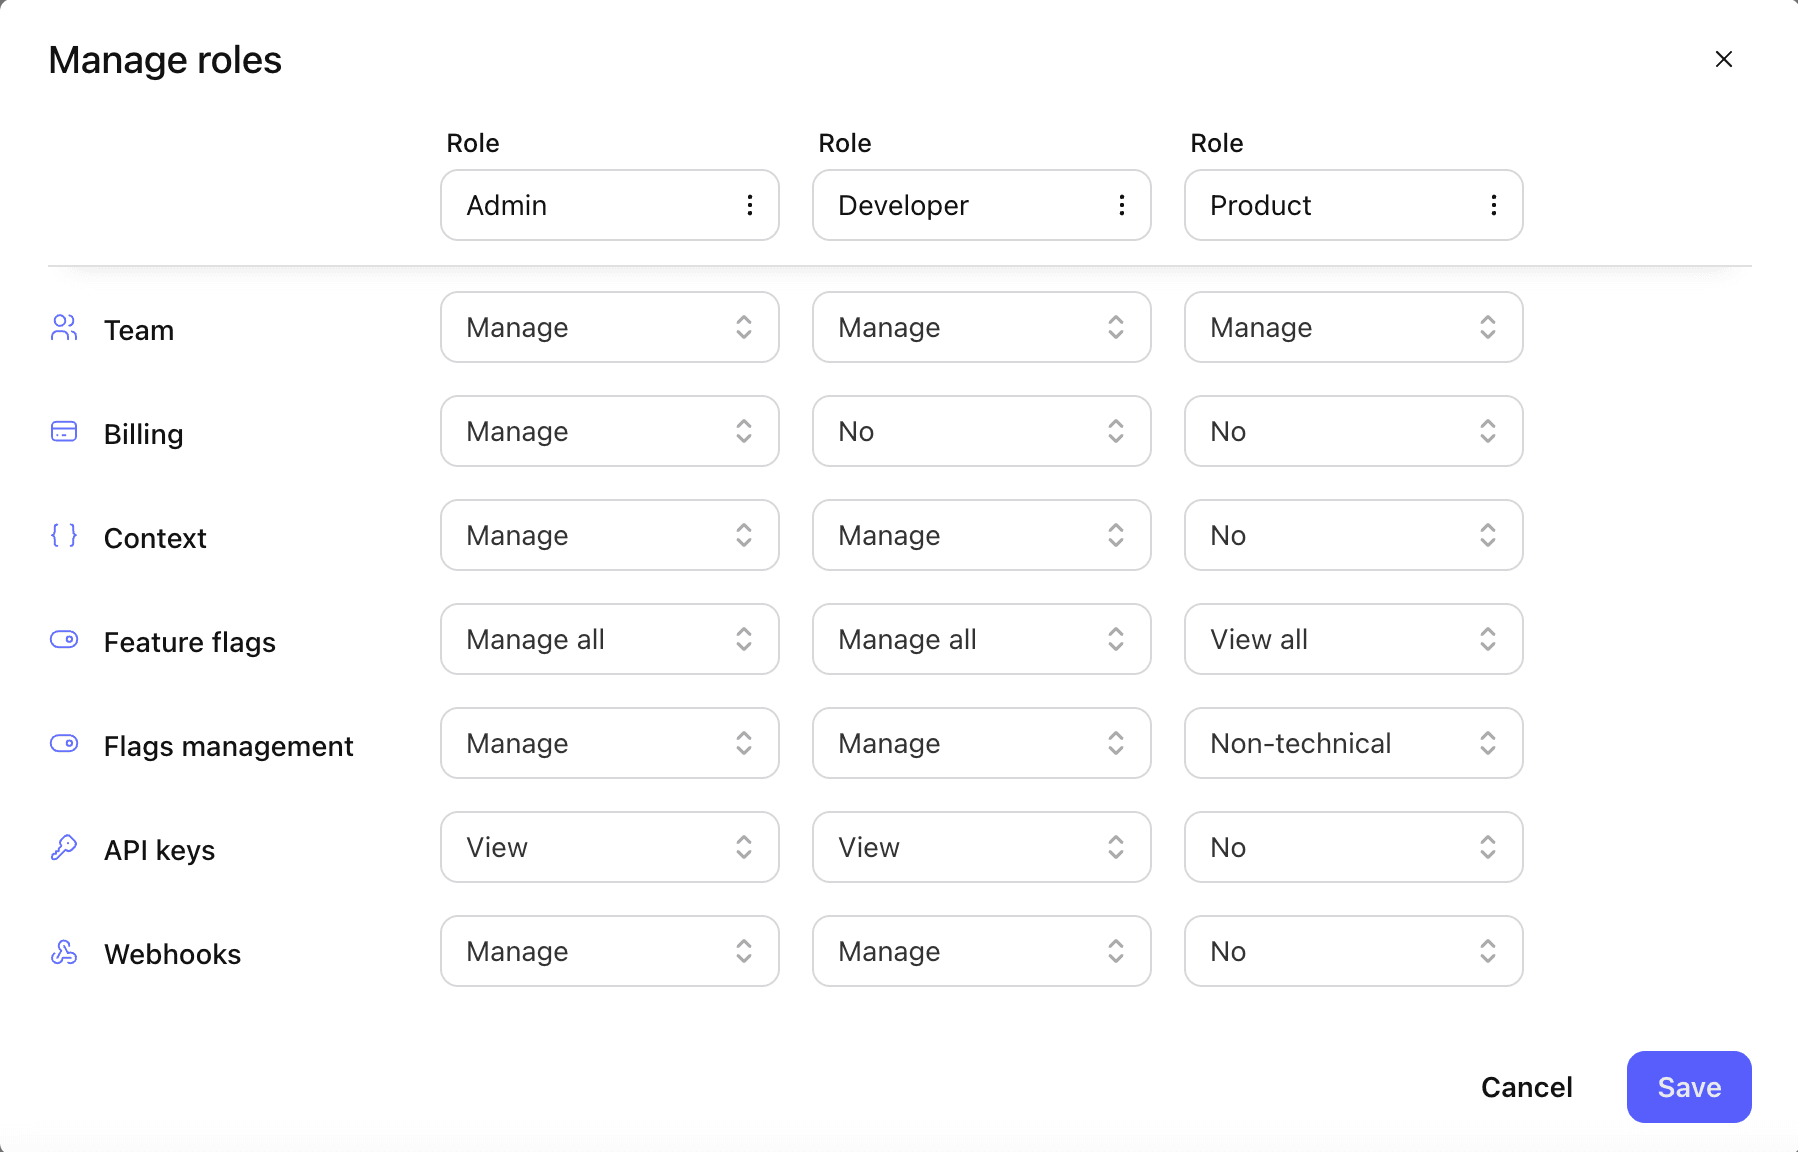
- Click on 'Manage roles': Here, you can create and customize roles with specific access types.
- Access configuration details:
- Team: Assign abilities like inviting new members or modifying roles.
- Billing: Allow management of billing-related settings.
- Context: Define who can view or manage context properties. Options range from full edit access to view-only or complete restriction.
- Feature flags: Define view and management permissions for feature flags. Decide if a role can see all feature flags or just those shared with them, and whether they can modify these flags.
- Flags management: Specify management levels for different flag aspects. Include permissions like creating new flags, editing existing flags, or managing technical settings of these flags.
- API keys: Control visibility of the API keys tab.
- Webhooks: Determine creation, update, and deletion permissions for webhooks.
Optimize your organization’s roles on Tggl
To streamline your initial setup on Tggl, we offer three predefined role types: Admin, Tech, and Product. Here’s a detailed breakdown of their access levels:
| Admin | Tech | Product | |
|---|---|---|---|
| Team | Full control over team settings, including inviting members and modifying roles (including their own). | Identical team settings management as Admin. | Identical team settings management as Admin. |
| Billing | Complete access to all billing information. | Billing information is completely hidden. | Billing information is completely hidden. |
| Context | Full management capabilities for all context properties. | Full management capabilities for all context properties. | The context menu is hidden for simplicity. |
| Feature flags | Full management rights over all feature flags. | Full management rights over all feature flags. | Can view all feature flags, but limited to managing only those shared with them. |
| Flag management | Full control over all aspects of feature flags. | Full control over all aspects of feature flags. | Restricted to non-technical aspects of feature flags. |
| API keys | Access to both client and server API keys. | Access to both client and server API keys. | API keys menu is hidden for streamlined experience. |
| Webhooks | Full permissions to create, update, and delete webhooks. | Full permissions to create, update, and delete webhooks. | Webhooks tab is not accessible. |
To prevent misconfigurations by non-technical teams:
- Hide complex menus: Conceal the “Context”, “API keys”, and “Webhooks” tabs.
- Limit flag management: Restrict their management capabilities to non-technical aspects.
- Restrict technical flags to tech teams only: If there are flags that are only for tech (e.g., if you use flags for a technical migration), you can restrict their access to only tech teams.
This approach simplifies their experience and provides safeguards against unintentional errors.
Best practices for effective collaboration
Establishing clear naming conventions for your flags
Your flag names should be intuitive and self-explanatory, providing immediate clarity on their function.
- Descriptive names: Use clear, descriptive names indicating the flag’s purpose.
- Example: “Enable New Checkout Flow” vs. “New Feature 1.”
- Action-oriented prefixes: Start names with verbs like “Enable”, “Disable”, “Show”, “Hide”.
- Example: “Enable User Onboarding V2”, “Hide Legacy Options.”
- Version inclusion: If a flag is version-specific, include this in its name.
- Example: “Enable Payment Gateway V3.”
- Avoid generic names: Use specific, unambiguous names.
- Example: “Increase Search Results Limit” instead of “Search Modification.”
Using tags to distinguish flag types
Tags are instrumental in categorizing and filtering flags.
- Use tags to distinguish between temporary (short-term experiments) and permanent (long-term features) flags.
- Example: Use tags like “Temporary-Experiment” or “Permanent-Feature” to classify the nature and duration of the flags.
- You can also use tags to reflect categories like feature areas, project phases, or teams responsible.
- Example: Tags like “Checkout”, “Beta Test”, or “Q1 Release” help in quickly identifying and grouping related flags.
Utilizing descriptions for enhanced clarity
Provide detailed descriptions for each flag, outlining its purpose, active and inactive states, intended duration, and any impacted metrics.
- Example: State “When active, this flag allows users to access feature X” instead of vague descriptions like “Controls visibility of feature X.”
Consistency and clarity in flag keys
- Tggl automatically suggests camelCase keys (e.g.,
EnableNewCheckoutFlow). - Manually adjust keys to align with your team’s coding standards if necessary.